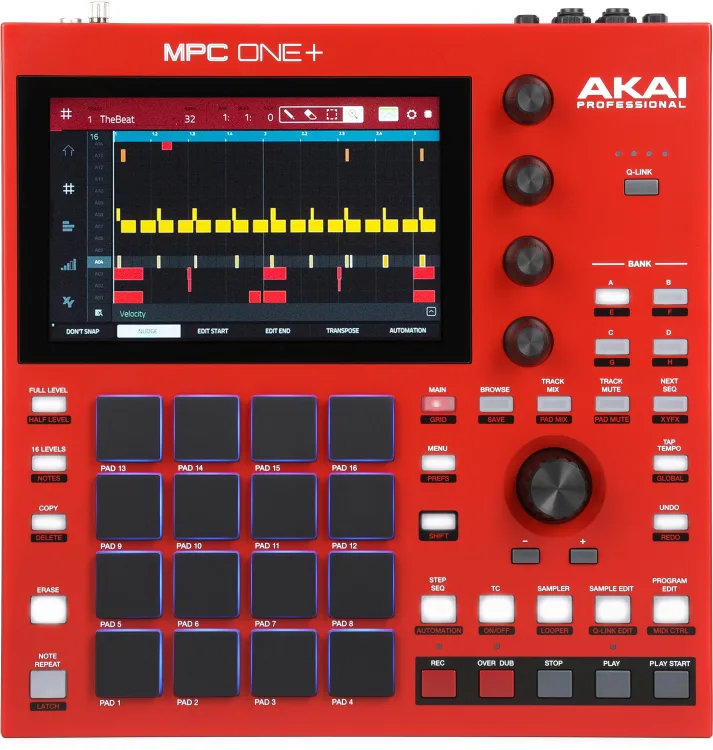

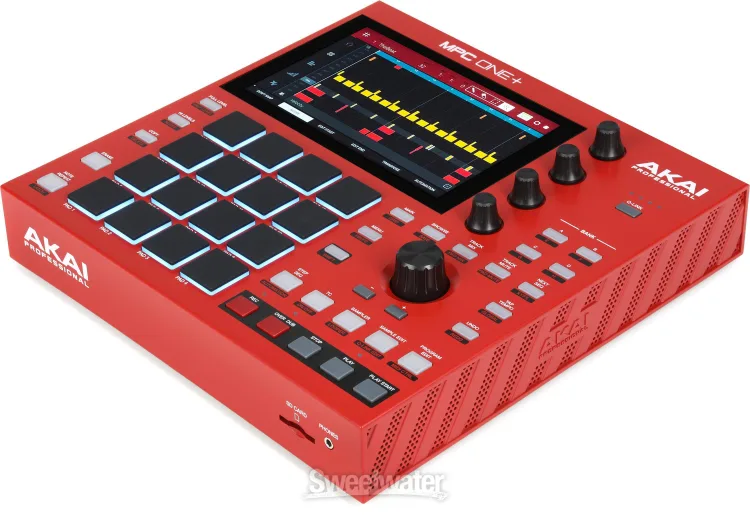
There’s a special kind of calm when you’re off the laptop, hands on pads, ideas flowing faster than menu diving. No notifications, no DAW crashes—just you, a sampler, and the groove. In this article, we’ll show you how to build a complete, repeatable production process around the Akai Professional MPC One+ Standalone—from sound capture and pad layout to arrangement, performance, and export. You’ll get practical templates for hip-hop, house/techno, and live looping; best-practice gain staging; and smart ways to wire MIDI, synths, and CV/Gate so every session feels intentional.
Shop Akai Professional MPC One+ Standalone
Why Standalone Wins (Even If You Love Your DAW)
A true all-in-one box changes your relationship with time. You power on and you’re already recording. The Akai Professional MPC One+ Standalone gives you tactile pads for rhythm, a multi-mode sampler for sound design, a full sequencer for arrangement, and effects for mixing—no computer required. It’s portable for couch sessions, rugged for stage work, and fluent enough to slot into a studio packed with MIDI gear and modular. Most importantly, it forces you to commit in fun ways: fewer variables, more music.
The MPC Mental Model: Projects → Sequences → Tracks → Programs
Understand the hierarchy and your speed jumps:
- Project: The container for everything—samples, sequences, and mix settings.
- Sequence: A timeline loop (bars + tempo + time signature). Build multiple for intro/verse/chorus or DJ-style scenes.
- Track: One lane in a sequence (drums, bass, keys, etc.).
- Program: The instrument on that track. Drum Programs map samples to pads; Keygroup Programs turn samples into playable instruments; Plug-ins run built-in synths; MIDI/CV tracks control external gear.
Once you see tracks and programs as modular building blocks, you can swap sounds without breaking your arrangement—huge for keeping momentum.
Capture: Clean Samples In = Clean Mix Out
A sampler is only as good as the audio you feed it. Whether you’re sampling vinyl, a phone memo, YouTube via interface, or your own synths, treat input gain like a gatekeeper:
- Set input level for healthy peaks (strong but never clipping).
- High-pass gently while sampling to remove sub rumble you’ll only carve later.
- Name samples on the way in (KICK_DRY_01, SNARE_CRISP_02) so browsing mid-flow doesn’t kill the vibe.
- Chop on transient for drums, or on grid/tempo for loops. Use threshold detection first, then hand-trim.
The Akai Professional MPC One+ Standalone makes this tactile—sample, trim, normalize, and assign to pads without leaving the creative lane.
Shop Akai Professional MPC One+ Standalone
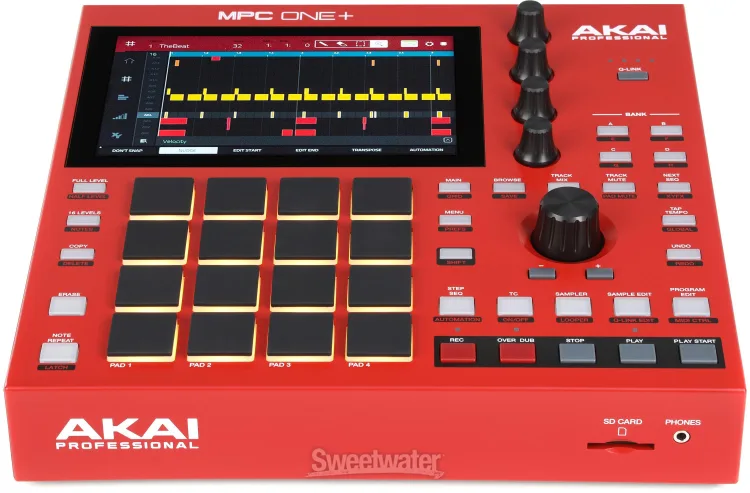
Pad Layouts That Play Like Instruments
Pad mapping is musicianship. Build muscle memory with consistent schemes:
- Drum Grid (Hip-Hop/Trap): Bottom row = kicks; next row = snares/claps; upper rows = hats/percs; four pads reserved for FX one-shots.
- House/Techno Grid: Kicks on 1 & 5 (variations), claps on 2 & 6, hats across a row (closed → open), toms/perc on upper pads.
- Performance Mutes: Keep a row of pads assigned to track mutes or performance macros, so drops and builds are one hit away.
Commit to a layout and reuse it across projects—the pads become an instrument you can “play blind,” which is everything on stage.
Sequencing: From Loop to Song Without Losing the Spark
Loops are easy; songs are hard—unless you make arrangement part of the groove:
- Build 8–16-bar “A loop.” Kick, snare, hat, bass, a chord stab, and a tiny motif.
- Duplicate to a new sequence and strip elements (no kick; hats skip every other bar) for intro.
- Create a “B loop” by switching bass pattern or chord inversion, not a whole new sound set.
- Scene the song by chaining sequences (Intro → A → A’ → B → Break → A).
- Record performance mutes to add movement without adding parts.
The Akai Professional MPC One+ Standalone excels at this “sequence-per-section” approach; your arrangement is literally a row of scenes you can reorder on the fly.
Drums That Hit: Velocity, Layers, and Swing
- Velocity-to-amp for hats and percs; keep kicks mostly consistent to anchor the pocket.
- Round-robin layers (multiple similar hits on the same pad with random layer select) to avoid machine gun hats.
- Nudge off-grid a few snares/hats by 2–5 ticks—human at micro scale.
- MPC Swing on hats first; 54–58% gives groove without fatigue.
- Transient shaper before compression to keep knock; add a hair of bus saturation to glue.
Treat the drum program like a mini-mix: pad levels, pan, and per-pad FX before you even touch the master.
Bass: Sub Without Mud
Keygroup a short multi-sample (or a single clean sample) and:
- Low-pass filter around 70–120 Hz to keep it fundamental-forward.
- Envelope: fast attack, short to medium release; avoid flab.
- Sidechain-style ducking: Use internal compressor keyed by the kick, or program subtle volume automation on the bass pad/track.
- Ghost notes: Add ultra-quiet in-between hits at 10–20% velocity to keep lines moving without crowding the kick.
A stable low-end is the foundation of stage-ready beats; the MPC’s per-track FX chain makes it quick.
Shop Akai Professional MPC One+ Standalone
Harmony & Hooks: Keygroups, Plug-ins, and Chops
Three ways to craft musical parts:
- Keygroup Instruments: Turn any sample into a playable instrument. Map root note, set key range, add filter/resonance, and sprinkle velocity-to-filter for expression.
- Built-in Plug-ins: Use on-board synth engines for polysynth pads, FM bells, or mono bass—automation on cutoff/res adds life.
- Chop/Resample: Slice a chord loop, assign to pads, and play new voicings. Commit with resampling to print FX or reverse stutters into new one-shots.
Hook writing becomes play when the instrument is one tap away from sampling and one tap from sequencing.
Performance: From Studio Beat to Stage-Ready Set
The Akai Professional MPC One+ Standalone is a legit performance brain:
- Track Mutes on pads: Treat them like a mixer—drop kick/snare for tension, bring bass after the fill.
- XY FX/Pad FX: Live filter sweeps, tape stops, and stutters. Keep a “rescue scene” (clean loop) on standby in case you go too far.
- Clip Programs: For house/techno, trigger audio clips synced to tempo—essential for long transitions.
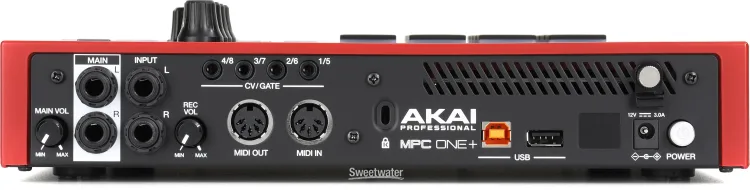
- MIDI Out & CV/Gate: Clock external drum machines, sequencers, and modular voices. One box conducts, the rest follow.
Build a live set as a single project with sequences for each song. You’ll flow track-to-track without loading breaks.
One Mixed Block (Bullets + Guidance): The 10-Minute Beat Sprint
When inspiration hits, run this sprint and capture a loop you’ll keep:
- Minute 0–1: Set tempo and swing; arm a drum program.
- Minute 1–3: Record a four-bar drum idea; quantize lightly (50–60% strength).
- Minute 3–5: Sample or pick a bass keygroup; record a simple bass line.
- Minute 5–7: Add one musical layer (pad/stab). Keep voicing minimal.
- Minute 7–8: Insert a fill on the last bar (snare roll, hat choke, tape stop).
- Minute 8–9: Duplicate sequence → remove kick/hats for intro.
- Minute 9–10: Save project with clear name, tag samples, color code tracks.
Ten minutes later you’ve got an intro and main loop ready to arrange—no laptop in sight.
Shop Akai Professional MPC One+ Standalone
Mixing on the Box: Headroom and Glue
Hardware mixes shine when you leave room to breathe:
- Gain stage per pad/track so your master never sits near clipping.
- EQ subtractively first: high-pass anything not living in sub land; cut mud (200–400 Hz) gently on busy pads.
- Bus approach: Group drums to a submix and add mild saturation/parallel compression; leave master compression conservative.
- Space with sends: One short plate reverb and one tempo-synced delay go a long way—send sparingly per part.
When you keep levels sane inside the Akai Professional MPC One+ Standalone, your two-track exports translate better to clubs and streaming.
Connectivity: Be the Brain of Your Rig
- MIDI In/Out: Clock and sequence desktop synths and drum machines; capture their audio back as samples.
- CV/Gate: Drive modular voices—clock, pitch, and gate lanes per track.
- Audio I/O: Resample your own performance, bounce stems, or route external FX.
- Storage & Expansion: Keep a curated sample library on removable media; tag folders by genre (BoomBap_Drums, Techno_OneShots).
The MPC becomes the command center—tight timing, simple routing, zero laptop necessary.
Finishing & Export: Stems, Two-Track, and DAW Handoff
There are three clean ways to “print” your work:
- Performance Print: Jam your arrangement live, record the stereo outs internally—perfect for mixtapes and beat videos.
- Song Mode Render: Chain sequences and bounce a two-track for quick sharing.
- Stem Export: Print individual tracks (or submixes) for later mixing in a DAW. Color code and name tracks so handoff is painless.
Decide the destination before you start; it changes how you structure sequences and effects.
Genre Playbooks (Quick Blueprints)
Boom-Bap / Lo-Fi: 86–94 BPM, vinyl one-shots, pitched-down chops, loose hats with 56% swing, tape/bit-crush on the drum bus, duck bass just a touch.
Trap / Drill: 130–150 BPM (double-time feel), 808 keygroup with glide, triplet hat rows with probability, subtle multiband comp on the 808, transient-focused clap/snare.
House / Techno: 122–130 BPM, kick on the ones, off-beat hat, clap on 2 & 4, one or two evolving synth lines, filter automation, clip programs for long loop transitions.
Shop Akai Professional MPC One+ Standalone
Practice = Speed: Build a “Day One” Template
Create a base project with:
- One drum program pre-routed to a drum submix.
- One bass keygroup with a sensible low-pass and envelope.
- One pad plug-in with mapped macros (cutoff/resonance/attack).
- Two send FX (short plate, synced delay).
- Color coding and track names already set.
Save as TEMPLATE_01. Every new beat starts focused and familiar on the Akai Professional MPC One+ Standalone.
Conclusion
A great groovebox doesn’t just replace a laptop; it rewires your workflow around touch, timing, and taste. When you treat projects, sequences, and programs like Lego bricks, sampling becomes fast, arrangement becomes playful, and performance becomes second nature. The Akai Professional MPC One+ Standalone gives you that complete circle—capture, shape, arrange, mix, perform, print—without leaving the box. Start with a day-one template, commit to a pad layout, and practice the 10-minute sprint. Track by track, you’ll build a catalog that feels human, punchy, and ready for stage or stream—made with your hands, not just your mouse.
Shop Akai Professional MPC One+ Standalone
FAQ
- Do I need a computer to make full songs on the MPC One+?
No. You can sample, sequence, arrange, mix, and export inside the unit. A DAW is optional for deeper editing or final mastering. - What’s the fastest way to go from loop to full arrangement?
Duplicate sequences for each song section (intro/A/B/break), then chain them in Song mode. Record performance mutes for dynamic drops and builds. - How do I keep drums sounding human, not robotic?
Use velocity, round-robin layers, light swing, and tiny off-grid nudges. Treat the drum program like a mini-mix: per-pad EQ and transient shaping before bus glue. - Can I control my synths or modular from the MPC?
Yes. Use MIDI Out for desktop synths and CV/Gate for modular voices. Clock and sequence external gear, then sample it back into the MPC. - What’s a good gain-staging approach on the box?
Keep pad/track levels conservative to avoid master clipping. Subtractive EQ first, then mild bus saturation/compression. Leave headroom for tasteful master bus processing. - How should I organize samples for speed?
Create genre-labeled folders and name samples as you record them. Tag favorites and keep a small “go-to” drum kit loaded in your template. - Is the MPC One+ good for live sets?
Absolutely. Map track mutes to pads, use clip programs for long transitions, and perform with XY/Pad FX. Build one project per set to move between songs seamlessly. - What’s the best way to export for mixing later?
Use stem export for each track or submix. Name and color code tracks before rendering so your DAW session is tidy from the jump.